


本記事では、エックスサーバー(Xserver)のXアクセラレータのバージョンを確認・切り替える方法について解説しています。
- サイト運営に必須のことが学べる
- 基本的な使い方~オリジナルテーマ開発まで学べる

 先輩くん
先輩くんAmazon Kindle Unlimitedに登録すると、月額980円で読み放題だからオススメだよ!
初回30日間は無料だから、まだ登録したことのない人はぜひ試してみてね!
- HTMLとCSSの基本が体系的に学べる
- Webデザインの基本が学べる
- 1つのWebサイトを作りながら学べる

Xアクセラレータとは
Xアクセラレータとは、Webサイトの読み込みを高速表示・安定化させる機能のことです。
Xアクセラレータには、現在「Ver1」と「Ver2」の2つからバージョンを選ぶことが出来ます。Ver1では静的ファイルの高速化(キャッシュ)の機能だけでしたが、Ver2では静的ファイルの高速化(キャッシュ)の機能に加えPHPプログラムの高速化の機能が実装されています。
キャッシュ機能を無効化した時とXアクセラレータVer2を比較すると、PHPの処理速度は最大20倍・WordPressの処理速度は最大10倍も違います。
つまり、XアクセラレータVer2の機能を使うことでアクセスしてきたユーザーに対していち早くページを表示させることができ、ユーザーの離脱対策やSEO対策の効果が見込めます。
Ver2を使う上での注意点
PHPバージョン
Ver2の機能にあるPHPプログラムの高速化は、PHPのバージョンが「PHP 8.2.x」「PHP 8.1.x」「PHP 8.0.x」「PHP 7.4.x」「PHP 7.3.x」「PHP 7.2.x」のいずれかに該当する必要があります。
運営しているサイトのPHPバージョンが該当しない場合は、PHPのバージョンを変更する必要があります。
先輩くんPHPのバージョンを確認・切り替える方法については、以下の記事で解説しているよ。

php.iniファイル
Ver2のPHPプログラムの高速化を利用する場合は、php.iniファイルの一部項目が無効化されます。
PHPのプログラムを動かすための設定ファイルです。
php.iniファイルの変更点については、こちらのエックスサーバーマニュアルをご確認ください。
Xアクセラレータのバージョンを確認・切り替える手順
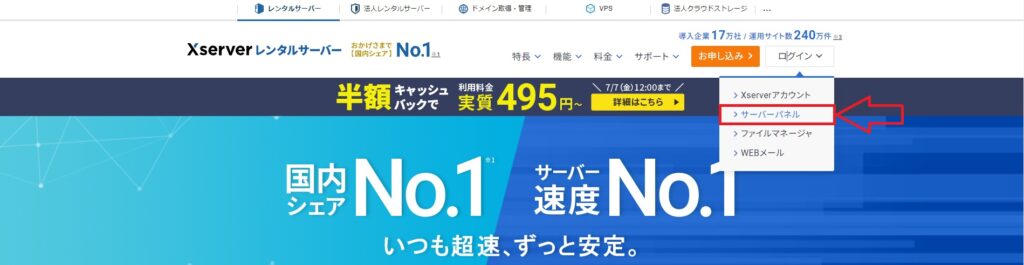
Xアクセラレータのバージョンを確認・切り替えるためには、エックスサーバーのサーバーパネルにログインする必要があります。
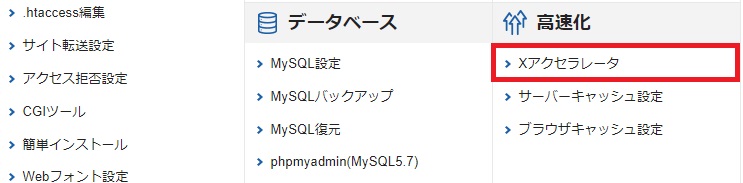
サーバーパネルにログインしたら「高速化」のメニューにある「Xアクセラレータ」をクリックします。
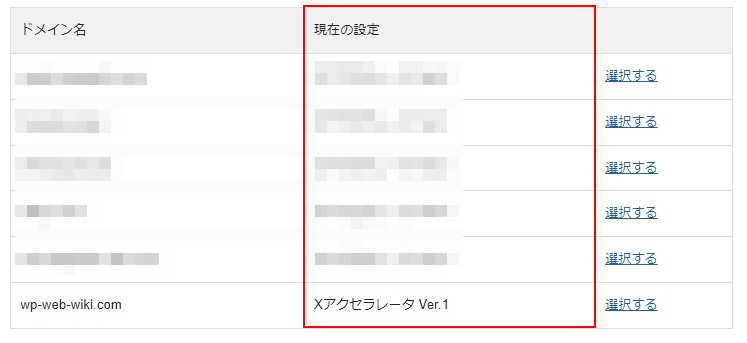
エックスサーバーに登録されているドメインに設定されているXアクセラレータの情報が表示されます。
先輩くんXアクセラレータのバージョンだけ確認したい人はここでストップしてね。
切り替えたいドメインの「選択する」をクリックします。
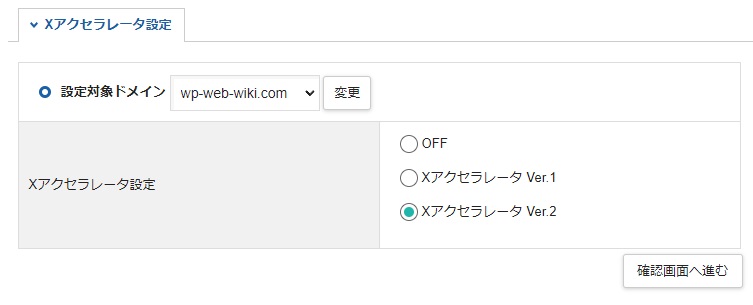
Xアクセラレータの設定項目に、切り替えたいバージョンを指定し「確認画面へ進む」をクリックします。
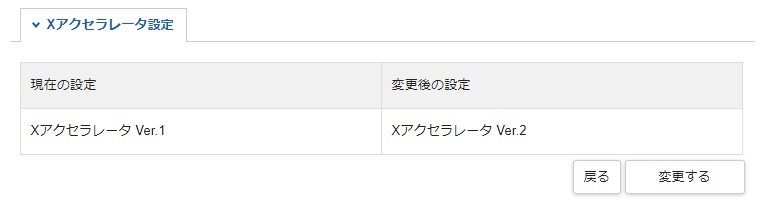
テーブル表の左側には現在設定されているXアクセラレータのバージョンが表示され、右側には切り替えたいXアクセラレータのバージョンが表示されます。設定に問題がなければ「変更する」をクリックします。
 先輩くん
先輩くん以上で、Xアクセラレータのバージョン切り替え作業が完了だよ。お疲れ様でした。